They look exactly same as general one side Yo-Yo from one side.

As you can barely see in this picture, they are double sided.

You can see through the other side in the hole in the center of the Yo-Yo.

The same gathered textures on both sides.

This is the tutorial for making a Yo-Yo which measures about 4.5cm in diameter. (Sorry that the measurements are all in metric. It is hassle to me to convert them into inches. I saved a lot of time by not doing that. Thank you!)
1) You will need a piece of fabric 5cmx13.5cm.

2)Fold it in half with the wrong side out. Sew the ends together with pretty fine running stitches. Don't forget to make a back stitch on the both ends.

3) Fold the seam allowance to one side. It doesn't matter which way you go.

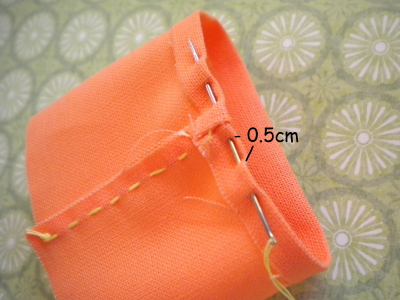
4) Fold 0.5cm from one edge.

5) Sew with about 0.5cm lengths of running stitches.
6) At the end make one stitch over the first stitch. This makes the gather secure and clean.

7) Pull the thread to gather.

8) Make a knot. One side is done.

9) Turn it over.


10) Fold the edge 0.5cm to inside.

11) Sew the edge like you did at 5) and 6). Then Pull the thread to shape it round like 7) and 8).

Finished! It was easy peasy lemon squeezy! Wright?

I am going to post about the projects applying these pretty double sided Yo-Yo next week. You probably want to make a few or more while you wait for the post. So you would be able to try the project right away.

I hope you enjoy this tutorial and have fun making them. Happy Yo-Yo making!
They are pretty and colorful, thank you for the tutorial!
ReplyDeleteThank you blandina!
DeleteThis is just too sweet! Thank you. I've never seen a project with double-sided yoyos, so I look forward to your next post!
ReplyDeleteI am glad you liked it! I'll try to make and show something delightful with these yo-yo! Thank you.
DeleteWhat a great idea! I can't wait to try it myself, Thanks, Sherry
ReplyDeletethanks Sherry. Looking forward to hearing your review!
Deletethank you so much for "you&me yoyo" my window will be very happy!! see and be seen.
ReplyDeleteRosa
"You and me yoyo" sounds very nice and cute for the name of this yoyo! I love that! Thank you so much Rosa.
DeleteThis is great! Can hardly wait till I see the things I can make with these yo-yos!
ReplyDeleteThank you SwwetARoma!
DeleteThank you for showing how to do a double sided yo yo. I haven't seen them done this way so I can't wait to get some made. I may even try crocheting some in wool or even a very fine wool for a scarf. Thank you again. Carolynn.
ReplyDeleteHi Carolynn,
DeleteCrocheting yoyos with wool sounds very cool! I need to try that too! Thank you for sharing your creative idea with us!
Love it! Thank you for sharing and such great instructions
ReplyDeleteYou are awesome!!! Thankyou so very much xxxx
ReplyDelete