Monday, January 21, 2013

Little pretty things made with double sided Yo-Yo

I am glad I finally finished somethings made with double sided Yo-Yo to show you as I promised in the last post! Hope they will give you some inspirations. The tutorial for making Double sided Yo-Yo is here in the last post.


These are Yo-Yo Key fobs. I made Yo-Yo with a vintage Torchon lace tape and inserted pieces of wool felt to add some colors. Embellished with vintage metal buttons and some pearly beads. Straps are crocheted cords.


This is the lace tape I used.


And I made miniature Yo-Yo earrings too (^o^)! A Yo-Yo for the earring measures about 3/4" in diameter. Multicolored stripes make a nice radial pattern on the circle.


 Flower pattern in pink made a romantic pair of earrings.


These are fun things to make! A very quick project. You can make them when you want to wear them!

If you have a lace remnant or ribbons, you should try to make one of these! It's easy.


More Yo-Yo projects will be coming  in the future. Stay tuned! Thank you for reading, and HAPPY YO-YO MAKING!

Saturday, January 12, 2013

Double sided Yo-Yo Tutorial

I see so many pretty Yo-Yo projects in the blog world. But most of them are about making and using common "one side" Yo-Yo. Today I would like to share the tutorial for making the "Double sided Yo-yo". I wonder how come I don't see these double sided Yo-Yo so much. Are they not popular? Are they too complicated to make? Maybe they just are not discovered by many crafters yet. Making double sided Yo-Yo is interesting. Since these Yo-Yo have the same looks on both sides, they work well for projects which you want finished look both in front and back. They are very good for making reversible items. Mobiles, curtains, room dividers, blankets, and so on!
They look exactly same as general one side Yo-Yo from one side.

As you can barely see in this picture, they are double sided.

You can see through the other side in the hole in the center of the Yo-Yo.

The same gathered textures on both sides.

This is the tutorial for making a Yo-Yo which measures about 4.5cm in diameter. (Sorry that the measurements are all in metric. It is hassle to me to convert them into inches. I saved a lot of time by not doing that. Thank you!)

1) You will need a piece of fabric 5cmx13.5cm.

2)Fold it in half with the wrong side out. Sew the ends together with pretty fine running stitches. Don't forget to make a back stitch on the both ends.

3) Fold the seam allowance to one side. It doesn't matter which way you go.

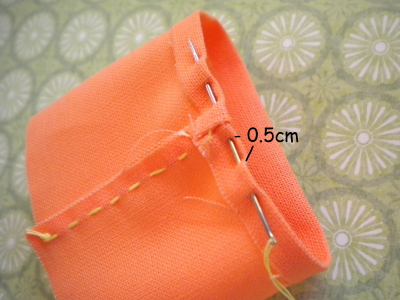
4) Fold 0.5cm from one edge.

5) Sew with about 0.5cm lengths of running stitches.

6) At the end make one stitch over the first stitch. This makes the gather secure and clean.

7) Pull the thread to gather.


8) Make a knot. One side is done.

9) Turn it over.


10) Fold the edge 0.5cm to inside.

11) Sew the edge like you did at 5) and 6). Then Pull the thread to shape it round like 7) and 8).

Finished! It was easy peasy lemon squeezy! Wright?

I am going to post about the projects applying these pretty double sided Yo-Yo next week. You probably want to make a few or more while you wait for the post. So you would be able to try the project right away.

I hope you enjoy this tutorial and have fun making them. Happy Yo-Yo making!


Friday, January 4, 2013

The first project in 2013

This is the new project I am working on now. The idea came up suddenly in my mind a couple days ago and now I have a clear vision of the finished product. Cannot wait to assemble everything in one piece.


Most patterns of the crochet motifs above are from this book by Keiko Okamoto.  


Tuesday, January 1, 2013

Japanese New Year's day Dinner

A happy new year! What was your first day of 2013 like? We celebrated our new years day with friends. We had Japanese traditional New year's day food for a dinner . Our first day of 2013 was fun, bright and yum! I'm going to share some pictures from our today's dinner table. I hope you'll enjoy them!


Saturday, December 29, 2012

Tutorial for reclaiming an area rug from your plain old carpet

OK, I think the long title is telling you all about today's post. Well, there is one thing you can't tell from the title. This is a No-SEW project. It is actually a very simple process. Many of you would not need a tutorial for this project. This is just kinda memorandum for myself. So I didn't mean to take those photos for sharing here in my blog. I apologize the bad lighting and the low quality of photos. I hope this post will inspire some readers who have a piece of carpet remnant or abandoned old rug.

I had this pretty good size of plain carpet remnant. It came with this house.  It was always lying around in the corner of our family room. I couldn't throw this away since the surface still looks fine except the raw edges were cut unevenly. I have been thinking how I can make it looks nice and usable again. Then one day I thought of framing those rough edges with pretty fabric. And it went pretty easy and quick. But the result was very satisfying. You can use this method to your old rugs as well. If you had a pattern on your rug, I suggest to go with solid fabric for the trim.

First, I trimmed my carpet remnant nicely. The fabric pieces you will need is...

*Two pieces of : 7"x Length of your rug           *Shown in the picture below.
**Two pieces of : 7"x (Width of your rug +2")     **This fabric is not shown in the picture below.


Fold and press all four pieces of fabric like in this picture below. Fold 1/2" on both edges and fold it in half.

Starting with the long side (the length) first.  Slide the carpet (rug) edge between a folded fabric piece. Glue the fabric edge onto the carpet surface using a hot glue gun. Work on the wrong side of the carpet as well. After finishing the both long sides, we are moving on to the short sides (the widths).

First, glue the fabric onto the right side of carpet. Leave 1" fabric as a margin on both ends.

Flip the carpet over, then fold the margin in and glue on the wrong side of carpet.

Fold the rest of fabric and cover the previous fold. Glue the fabric along the widths to finish all the framing.

The corner is neatly done.

That's all. Here you have a "NEW" beautiful area rug.

If you had a colored rug, that would be more fun to pick a fabric (or two) for framing. I used a medium weight cotton canvas. Light weight fabric like quilting cottons wouldn't be so easy to work with for this project. I suggest medium to heavy weight home decor fabric.

I enjoyed this project. I made some bath mats with this method. I folded old bath towels and trimmed with fun printed cottons. I hope I won't forget to show you those bath mats sometime. The finished area rug is now lying in the little sitting area in my studio. I love the clean look of this rug. I wish I had some more carpet remnants I could embellish! ;p

This might be the last post in 2012. I have a lot of fun plans and projects for 2013. You will see more tutorials and patterns. And also I would love to have some activities that you can involved in. I want to say thank you to all for supporting my blog and encouraging me not to stop creating through the year. I am so glad that I dared to start this blog three years ago.

I hope all of you will have a wonderful new year. Thank you so much!

**********
This is a notice about my Etsy shop. The shop will be closed in January 2013. The exact date for reopening isn't decided yet. I will announce it in this blog, twitter, and facebook. Some products will show again and some won't. The shop will be closed on Dec.31.